Google Chrome allows sites to send push notifications, and many resources are actively using this opportunity. It is understood that this is the right tool that simplifies the work with a particular site and helps users to be aware of all events. But in reality, these notifications can be very annoying and over time often begin to be perceived as spam.
It is worth spending a couple of minutes disabling irrelevant push notifications and not wasting time and nerves reading them.
How do notifications work in Google Chrome on Android
The main purpose of notifications is to force the user to spend as much time as possible on the site, to perform more actions on it. And usefulness and convenience for users is another issue that is not even always a priority. Some website builders and SEOs still find the aggressive use of notifications very effective (and completely in vain).
Enabling notifications is easy – this window is impossible not to notice. But turning them off is already more difficult, and many users do not even try to do this, continuing to act out of habit, automatically closing messages (sometimes without even reading them).
The site needs the user's permission to send out its alerts. You can either grant or revoke this permission at any time.
On some sites, Google Chrome blocks notifications automatically. This happens when messages are perceived by the browser as intrusive or questionable. In the future, Chrome will continue to offer to block alerts on web resources that do not inspire confidence. For example, Chrome can automatically block notifications from being sent if the majority of users opt out of doing so on a particular site.

If you use the browser in incognito mode, notifications will not appear, and for this you do not have to reject the site's offer to send them.
How to turn off notifications
Notifications can be configured to come from one or more of the sites you want to send, or you can block them from all resources.
Many users are accustomed to automatically responding to notifications – the impressions of them are limited to second irritation, which is immediately forgotten. It would seem that this is not such a terrible inconvenience to specifically allocate time for setting up notifications for yourself on frequently used sites. But such little things imperceptibly add up to a very decent amount of time, which is spent simply on closing the windows. And this time can be used much more rationally – so we highly recommend not to neglect the notification settings.
Before you start turning off notifications, you need to analyze all the frequently used sites – probably some of them send useful information that you will want to receive regularly.
If the sound of incoming messages bothers you, you can turn it off. To do this, there is an option "Do not interrupt my work when requesting permission to show notifications."
If you once agreed to send notifications, but never read them – over time, the site will stop sending them to you. This is one of the reasons why you need to periodically monitor your notification settings on sites and check their relevance. Perhaps among them there is a resource that you like, and its notifications are also important for you, but for some reason for some time it is not possible to open and read messages.
For example, you plan to study English, have subscribed to notifications from this site – but so far there is a catastrophic lack of time for classes. As a result, messages accumulate, and the site's algorithm reads this unambiguously – the user is not interested, so you need to stop sending. But you want to keep getting them! And there can be many such sites. Setting up messages will help to control this procession in time to receive news from the right sites, without plunging into information noise.
For all sites
If you do not want to receive notifications from any sites at all – you need to specify this in the settings and forget about pop-up notifications forever.
Precedence rule:
- Open the Chrome browser on your Android;
- On the right side of the address bar we see an icon with three dots, click on it;
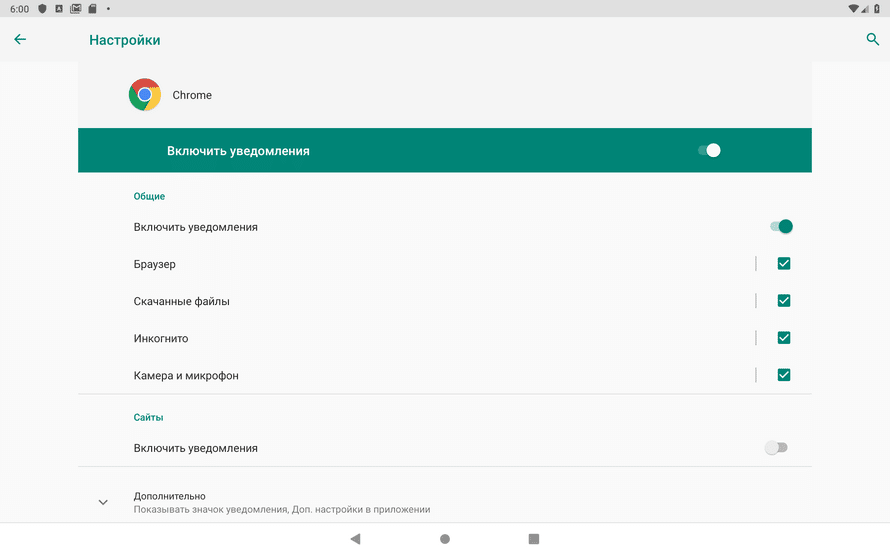
- In Settings, select the Notifications section;
- Scroll to the very bottom to the stop, here we see the Section Additional settings in the application. Go into it and put the switch in an inactive position – now notifications will be blocked for all sites.

This is the most radical way that will help to completely disable notifications from all web resources.
For specific sites
If you generally treat notifications positively, and are ready to receive them from certain sites – this can also be done in the settings. Such a selective approach to obtaining information will help not to miss what you need and are interested in.
To enable or disable notifications on certain sites, you should proceed as follows:
- Run Chrome on your mobile device;
- Open the site on which notifications need to be configured;
- Click the icon with three dots, which is usually used to access the Settings section;
- Here at the top we see the icon with The Information about the page, click on it;
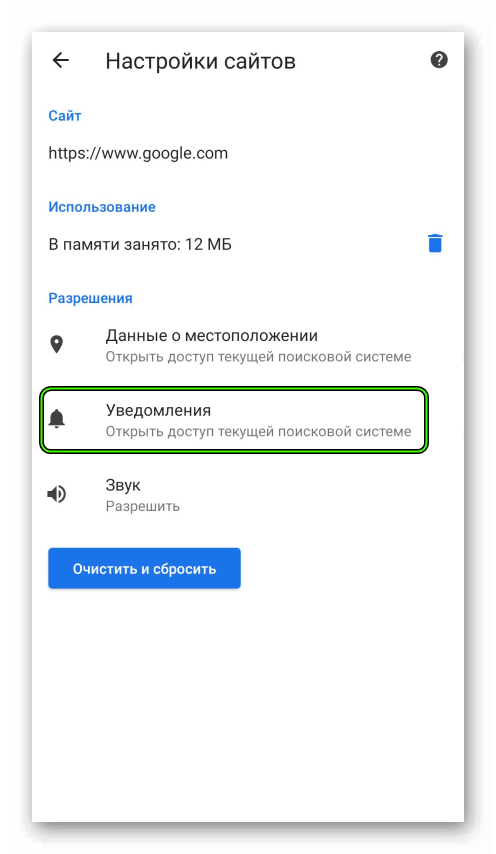
- We see the Site Settings window, in which there is an option Notifications with the ability to enable and disable. But this setting may not be. If it does not exist, it means that this resource does not use alerts at all.

The entire setup process will take no more than a minute – and after that you will never be distracted by annoying notifications.
Prevent sites from sending notification requests
Some users prefer to completely protect themselves from site requests to display notifications.
This is done as follows:
- Open the Chrome app on your mobile device;
- Go to the settings by clicking on the icon with three dots;
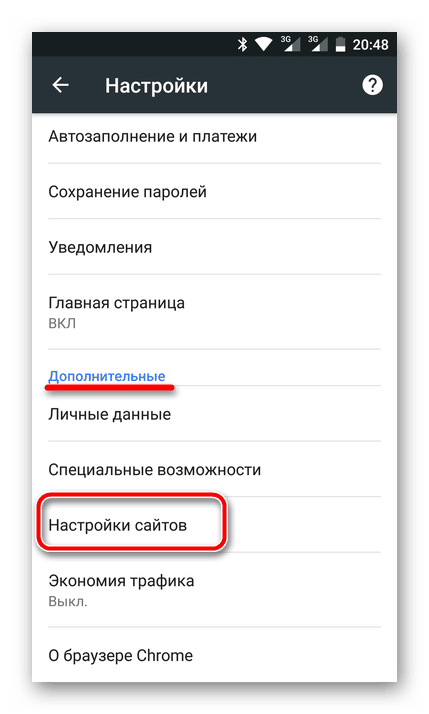
- Go to the Advanced section, then go to the Site Settings;
- Here we select the line "Pop-ups and redirects", put the switch in an inactive position – that's all, you will no longer see requests to display notifications.
After all the settings are made, you will immediately feel how much more pleasant it has become to work with Chrome.


