Every year and even a month there are more and more restrictions that make it difficult to work in the network. The source of restrictions is usually the peculiarities of the legislation, and they may differ even in neighboring regions. And the differences in the legislation of different countries are sometimes the most cardinal and unexpected – but this will not prevent you from accessing any information, if you know how to use a proxy server. Using a proxy server allows you to bypass almost any blocking and at the same time maintain anonymity.
Why do I need a proxy server?
Restrictions on access to resources are rarely justified. Blocking can be imposed on a territorial basis, usually both the government and the provider are involved in such decisions. If your favorite resource is suddenly blocked – you just need to install a proxy in Google Chrome, and the problem will be solved.
A proxy server is an intermediate channel that acts as an intermediary between you and the site. It is necessary to:
- maintain anonymity in the process of Internet surfing;
- get to some blocked sites and pages;
- Hide your IP address.
In most cases, the resource you visit does not even suspect that you are encrypting your own channel with an additional server – this creates additional protection for the user.

Setting up a proxy server in Google Chrome allows you to hide your actual address, which sometimes needs to be done for various reasons – for example, to visit blocked sites, communicate in chat rooms, participate in online games.
Set up a proxy server in Google Chrome
Proxy configuration in Chrome is performed directly from the browser – fortunately, the functionality allows it. To begin with , you need to clear the history – this is the first and mandatory stage:
- ctrl+h open the "History" combination;
- click "Clear History";
- in the window that opens, mark everything that needs to be deleted: the history of views, downloads, etc.
This must be done in order to protect your personal data, otherwise some resources can track data even about anonymous users using cookies.
There are 2 main ways to configure a proxy server – in the browser itself and with the help of extensions.
The most popular extensions are:
- iNinja VPN & Proxy;
- FastProxy;
- FoxyProxy Standard;
- FriGate;
Proxy settings in some extensions are applied automatically, in others the parameters must be set manually.
You can change the proxy server settings in the browser itself only on a PC, in the version for mobile devices there is no such functionality:
- open Chrome, click on the icon with three dots at the top right and get into the menu;
- here we find the item "Settings", go to it;
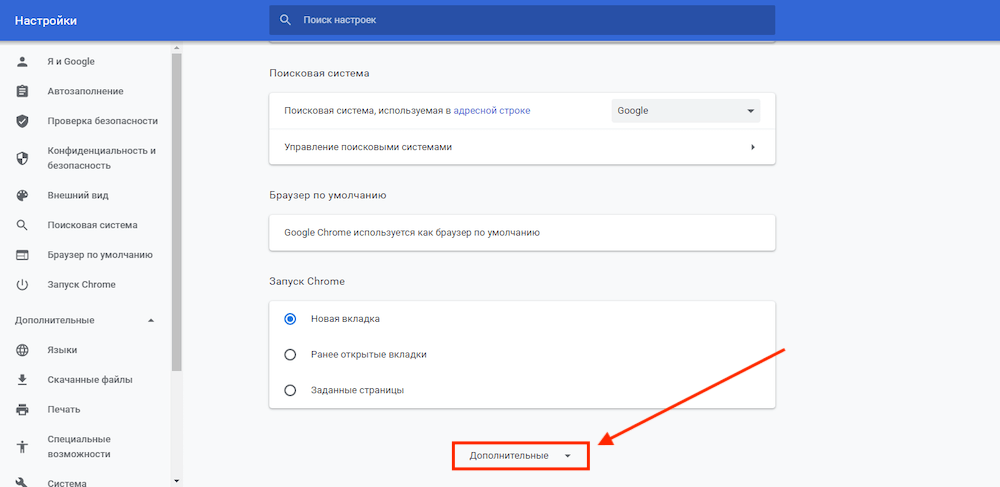
- in the tab that opens, scroll down and find the Advanced item, open it.
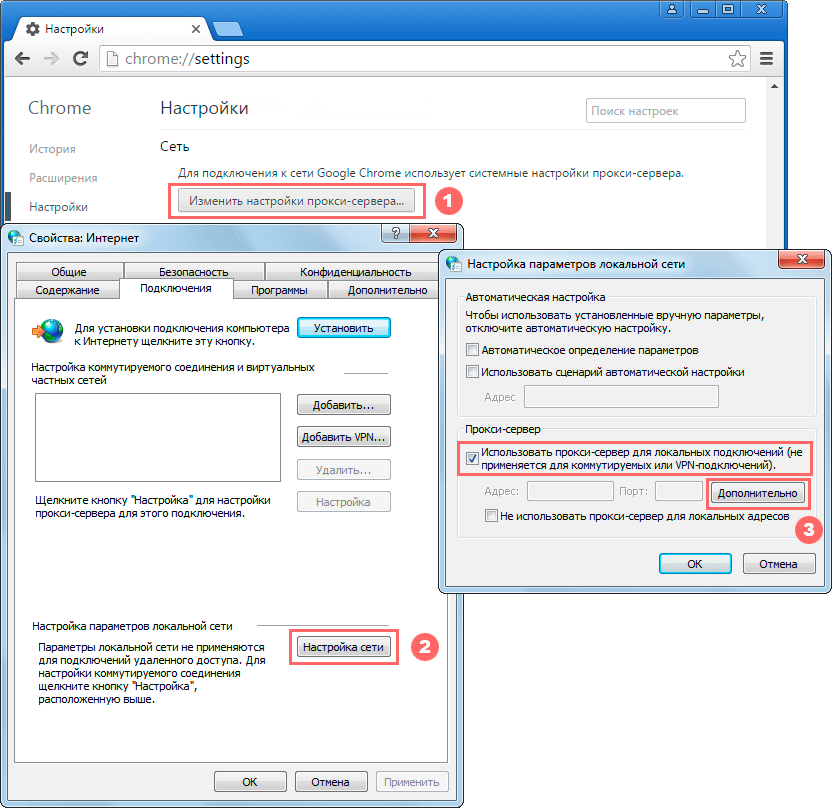
- find the "System" subsection, in it we see the line "Proxy server settings", click on it;
- we see a pop-up window in which you need to click the "Network Settings" button;
- Another additional window will appear in which you need to uncheck the box next to "Automatic detection of parameters";
- below, in the "Proxy server" section, activate the "Use a proxy server" option and enter the proxy data: host and port;
- click OK and "Apply".
The login and password will be requested by the browser itself at startup, so it makes sense to store this data somewhere at hand in a text file.

Top 10 Free Proxies
For many users, the functionality of free proxies is quite enough. At the moment, the most reliable and convenient are:
- KProxy
- ProxySite
- me
- HMA
- Hidester
- Anonymouse
- Megaproxy
- NewIPNow
- 4everproxy
- ProxFree
Using free proxies is not the most secure solution, but it is still much more reliable than demonstrating your IP address, through which you can access many data.
Free versions almost always have some limitations – for example, related to the number of blocked files, traffic, etc. If you need round-the-clock reliable protection, it is worth switching to the paid version – many users eventually come to this solution, for whom both data security and convenience of working on the network are important.
To cancel the use of a proxy server
Disabling a proxy port is performed in the same way as connecting it, depending on the method you choose.
After that, you need to restart the browser – and you can continue to work on the Internet in the usual mode.
Configure proxies in other browsers
It does not matter which browser you use – proxy settings can be made not only in Chrome, but also in any other browser. The algorithm is approximately the same, only some stages differ.

Configure a proxy in Internet Explorer
Internet Explorer, despite its clumsiness and unpopularity, remains a built-in browser on all Windows PCs. Therefore, it is very useful to know how to configure a proxy in it. To do this, perform the following actions:
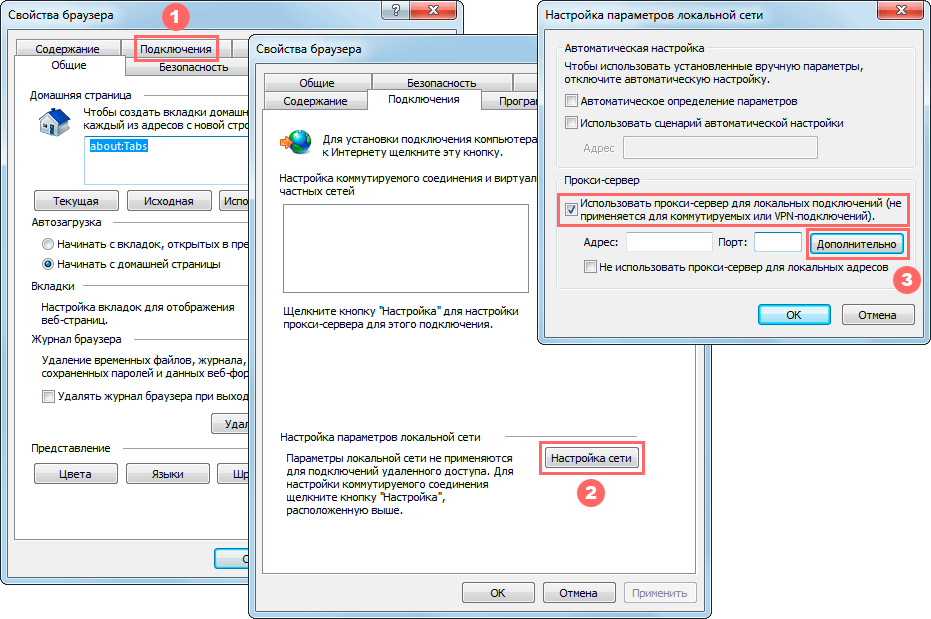
- start Internet Explorer;
- open "Internet Options";
- a window opens in which you need to select "Connections";
- at the bottom right we find the Network Settings button and click on it;
- in the window that opens, check the box "Use a proxy server for local connections".
Server data is specified through the "Advanced" section.
Setting up a proxy in Opera
In this browser, the configuration will be performed according to the same algorithm, the difference is only in the path to the configuration. In Opera , this is done as follows:
- open the browser;
- at the top left, click on the Opera logo;
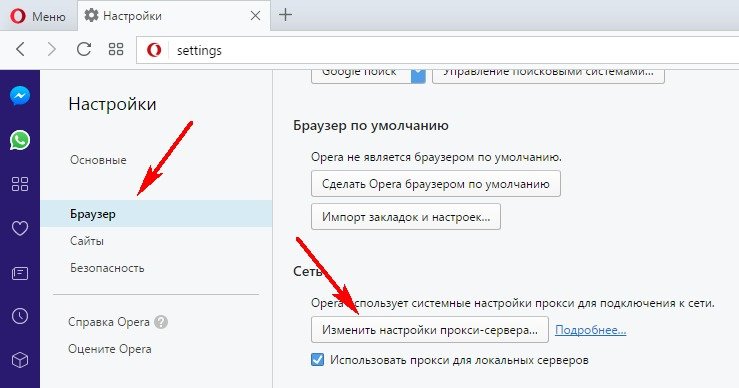
- the menu drops out, in which you need to select the "Settings" line, click on it;
- in "Settings" we find the "Advanced" section;
- at the very bottom of the System section;
Here we select "Open proxy server settings for your computer" and set the parameters:
- Define parameters automatically – turn off;
- Use a proxy server – enable.
Next, fill in the fields, confirm the changes – that's all, the proxy is configured and ready to work.
In addition, Opera has a built-in VPN, which is activated by a special button in the left corner of the address bar.
If the VPN icon is not there, then you need to activate it in the "Menu" – "Settings" – "Advanced" – "Features" – "Enable VPN".

Basic settings are performed in much the same way as in Chrome and Opera.
Basic steps:
- open the menu by clicking on the icon with three bars;
- go to "Settings";
- scroll down to network settings;
- click the "Configure" button;
- select "Manual configuration of the proxy service".
Then it remains only to fill in the channel data – HTTP proxy and port, and then save all the changes.


